
Great interest in pumpkins, as a material for creativity, began with the development of carving (Thai art of artistic carving on vegetables and fruits). A variation of this direction is Gourd – carving on dried pumpkins.

Mostly this berry is a pumpkin, now remembered at the end of October, when they begin to prepare for Halloween. But great interest in pumpkins, as a material for creativity, began with the development of carving (Thai art of artistic carving on vegetables and fruits). A variation of this direction is Gourd – carving on dried pumpkins.
In the West, gourd art is a fairly common direction in decorative art. But not every pumpkin can be used here. There should be only dry fruits that resemble a tree in structure. Those pumpkins from which porridge is made cannot be dried like this. A special decorative variety is needed here.
Varietal mixtures of ornamental pumpkin are divided into two varieties – small-fruited and coarse-fruited.
The first are two-three-color varieties with small fruits of bizarre shapes. Coarse-fruited are mainly yellow and green pumpkins in the shape of a bottle.
The Krone variety produces ellipse-shaped pumpkins with orange, white and green growths. Bischofsmutzen are two hemispheres of different sizes, fused together, and have a white-green and brownish-red color. The fruits of the Warsen variety are multi-colored, with a warty skin.
But the best variety for carving is Gorlyanka (Lagenaria siceraria). This is a bottle or dish pumpkin that loves illuminated sunny places. It should be sown in May. Best of all, they grow on heaps of manure, every half meter they dig holes into which seeds are thrown. When the first true leaves appear, the soil near them is mulched, and the grown shoots are tied to sticks on which pumpkins grow all season. In summer, they need to be well watered and fed. Fully ripe fruits are harvested, it is from them that the best material for crafts is used.
Now the pumpkin must be adequately dried, otherwise it will be bad to work with it. It is necessary to dry the pumpkin for several months in a cool, well-ventilated room. It is better to do this on a wire rack to prevent decay. But the best option is to hang the fruit, if the room allows. The stalk should be cut off evenly, with a sharp knife, because it is through it that moisture evaporates.
There are other methods of high-quality drying of pumpkins – with the removal of seeds, etc., but when it dries, it will acquire the color of red skin.
When you manage to dry the pumpkin, the most interesting thing will begin – the creation of a masterpiece.
First you need to decide what to create from a pumpkin – a vase, a box or a lamp? Next, the cutting method is selected – surface or slotted. If it makes sense to cover the lower part of it with a superficial carving so that water does not leak out.
And slotted carvings look very beautiful on lamps and candlesticks, which will cast bizarre shadows on the floor and walls. Various combinations of these types of carvings also look pretty good.
The pattern that you want to observe should be transferred to the surface. This is done with a pencil, and if necessary, the drawing is circled with a marker with a 1 mm pen. When there is no certainty that an even pattern will be immediately obtained, first draw guides – radii from the center of the pumpkin or translate the drawing using carbon paper.
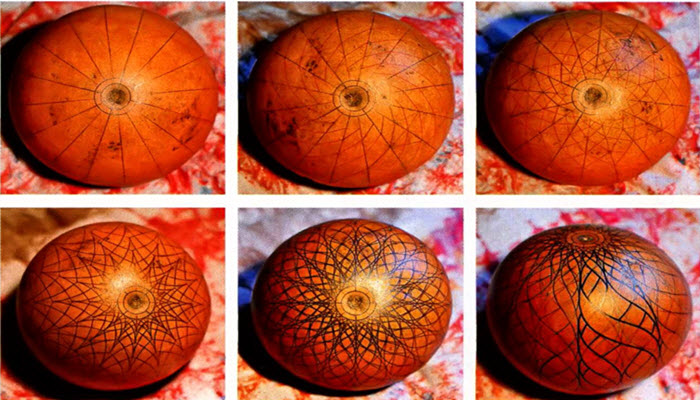
Gradual drawing
You also need to choose a cutting tool. But here everything is like in classic wood carving – cutters, although you can also use a drill.
The cutter feels the material better, which makes it possible to stop in time when the work does not go according to plan. But then the work is slower.
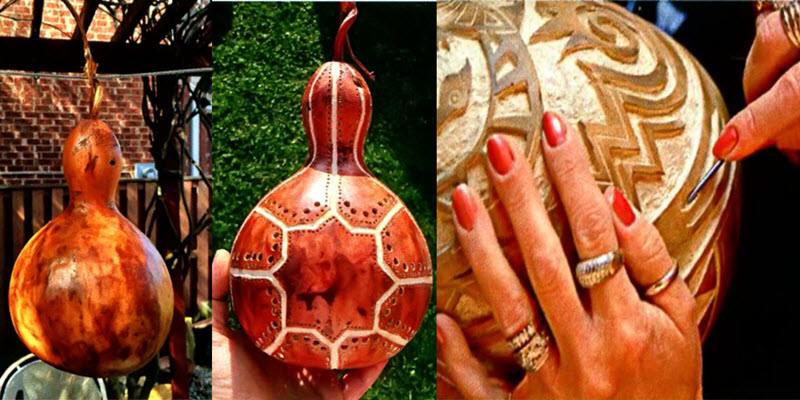
When the carving is done, the pumpkin can be painted. Some craftsmen stick to natural natural colors, others choose brighter colors.
More ideas for pumpkin crafts are here – https://vdomadobre.info/porobki-dlya-ditei/porobki-z-garbuza-na-svyato-oseni.html
Try it, it’s quite an exciting kind of creativity.